

Aim: To make life easier, use the CAD environment's user coordinate system (UCS) to align 3D laser scan data (point cloud) parallel to the screen.
Point cloud data is generally available in local user-defined grids “arbitrary” or “OS” grids. As a result, it may be difficult to get it parallel to the screen.
In this article, I worked with point cloud data using the Cloudwox plug-in. You can also utilise the built-in AutoCAD point cloud cropping tool.
Attach Point cloud
- To load a point cloud file in AutoCAD: do the following: Insert - Attach - then follow the AutoCAD instructions.
- Lock it after attaching the point clouds to the CAD environment; otherwise, it will move or change coordinates while working with the point cloud.
- Once it's locked, you can't slice or crop it with AutoCAD's point cloud tools. So I used the Cloudworx plug-in to create CAD models.
- Cloudworx is a product of Leica Geo systems. It has also range of product to work with different CAD environment.
Assign UCS
You can get access of the fly toolbar to assign UCS.
- Command: Tools – Toolbars – AutoCAD – UCS I and UCS II

- All of the above functions can be accessed via the command line by using the UCS command and follow the instructions to complete the procedure.
 |
 |
|
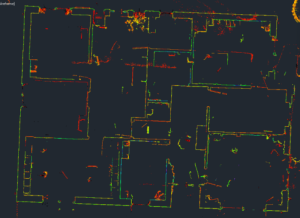
a) Original Point cloud |
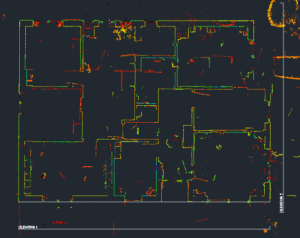
b) Oriented Point cloud by UCS |
Tips: UCS follow: 1 for UCS active and 0 for inactive, while active, it will change orientation as needed, which is great for speeding up work flow.
UCS detect: 0 for inactive and 1 for active, always set to 0 to avoid getting a hatch box while dealing with any command.
Step 4: Elevation/section
Once the floor plan is complete, elevations and/or sections may be required. Take slices as you need from the point cloud and flip to elevation / section. You will also need a copy of the floor plan to create elevations/sections to tie up/match the walls and windows lines.
To copy floor plan: do the following: select plan, Ctrl+C, go to elevation then Ctrl+V.
 |
|
Enlarge View to Plan 1 |
 |
 |
|
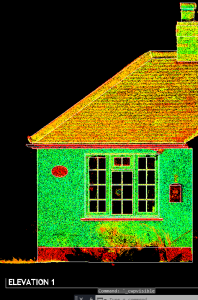
Oriented Point cloud to Elevation 1 |
Raw Elevation |
 |
|
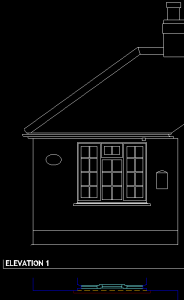
Final Elevation |